In this brief tutorial, we’ll guide you through the process of installing Node.js and NPM (Node Package Manager) on both Windows & Mac operating systems. Node.js is a robust JavaScript runtime that allows the development of scalable & efficient web applications. Meanwhile, NPM serves as the default package manager for Node.js granting access to a vast ecosystem of libraries & tools. Let’s begin with the installation steps.
JavaScript has emerged as a preferred language in the software development sector. Front-end developers strive to create user interfaces with rich features using JavaScript, while also interacting with back-end web services through AJAX. The non-blocking nature of JavaScript has led server-side web developers to transition their approach towards utilizing JavaScript.
In modern website development, there are many tools like TezJS, VueJS, React, Angular, and others. They use a programming language called JavaScript to make the website work well and run smoothly. JavaScript is chosen since it’s good at making the code efficient and fast. Opting for JavaScript development services as your primary choice not only allows you to master a single language but also enables the development of “full-stack” web applications. Node.js plays an important role in driving this server-side JavaScript revolution.
Let’s explore the concept of Node.js.
Table of Contents
Node.js
Node.js is a versatile platform that enables the execution of JavaScript code outside of the web browser. It functions as an implementation of Chrome’s V8 JavaScript runtime engine, facilitating the creation of server-side JavaScript applications. Node.js includes all the necessary components to run programs written in JavaScript.
One notable advantage of Node.js is its extensive package ecosystem with over 50,000 NPM (Node Package Manager) packages. This wealth of packages enhances development by providing efficiency, scalability, speed and cost-effectiveness. Consequently, many enterprises prefer Node.js over other backend technologies.
Notably, various global brands listed in the Fortune 500 have embraced Node.js for their enterprise applications. By doing so, they have experienced superior levels of both speed and scalability contributing to the platform’s widespread adoption and success.
To utilize the capabilities of Node.js, powered by JavaScript, for product development involving real-time features and resource-intensive I/O processes, a crucial initial step is understanding the utilization of NPM packages. This guide provides comprehensive insights into the recommended practices for installing Node.js and NPM on your system offering detailed step-by-step instructions. Now, let’s delve into the installation guide for Node.js development.
What is NPM?
The Node Package Manager (NPM) serves as the primary package manager for Node.js. Node.js provides a JavaScript runtime environment that allows developers to create scalable applications within a specified timeframe.
NPM allows open-source web developers to exchange and utilize packages for application development. Additionally, it serves as a command-line tool for package installation in projects, dependency management & version control handling.
Components of NPM
1) Website
Explore packages for your project on the official NPM website. Additionally, you have the option to establish & configure profiles for the management and access of various package types.
2) Command Line Interface (CLI)
The Command Line Interface (CLI) operates through your computer’s terminal to connect with NPM packages and repositories.
3) Registry
It has a huge database of meta-data and JavaScript projects. This allows you to access any supported NPM registry. Also, you have the flexibility to use someone else’s registry following their terms of use.
What is Node.js?
Node.js is a cross-platform JavaScript library and runtime environment that operates as an open-source platform. Developed by Ryan Dahl in 2009, the latest version, v18, was released in October 2022. It allows the execution of web applications outside the client’s browser. This integrated development environment (IDE) is particularly well-suited for creating server-side web applications. Its utilization of an asynchronous and event-driven model makes it the best choice for creating data-intensive applications.
Node.js 19 allows you to stay informed about the most recent changes & features. As an odd-numbered release line, Node.js 19 will not transition to Long-Term Support (LTS).

Furthermore, following the previous achievement of Node.js 20, the latest version, Node.js 21, has been released. It’s worth noting that this release corresponds to an odd-numbered line. Consequently, Node.js 20 has been elevated to long-term support (LTS) status ensuring ongoing support until April 2026. Meanwhile, Node.js 21 will serve as the ‘Current’ release for the next six months maintaining this status until April 2024.
As per the 2022 Stack Overflow Developer Survey, Node.js stands out as the most favored web development technology. Additionally, Node.js has emerged as the predominant tool for web development in the United States, boasting usage on over 6.3 million websites.
Node.js architecture enables the management of multiple concurrent clients simultaneously through its “Single Threaded Event Loop.” The processing model of Node.js is founded on the event-based nature of JavaScript and utilizes the JavaScript callback mechanism.
Requirements
Before proceeding with Node.js and NPM, ensure that you meet the following prerequisites:
Hardware Specifications
- RAM: 4GB
- CPU: Intel Core i3TM i3 HQ CPU @ 2.50 GHz
- ROM: 256 GB
Software Requirement
- Chocolatey
Installing Node.js & NPM on Windows
Having chosen Node.js for our application development, the initial step involves installing Node.js on your Windows system. In the following sections, we will guide you through the installation process, covering each step in detail.
Let’s begin with the first step now.
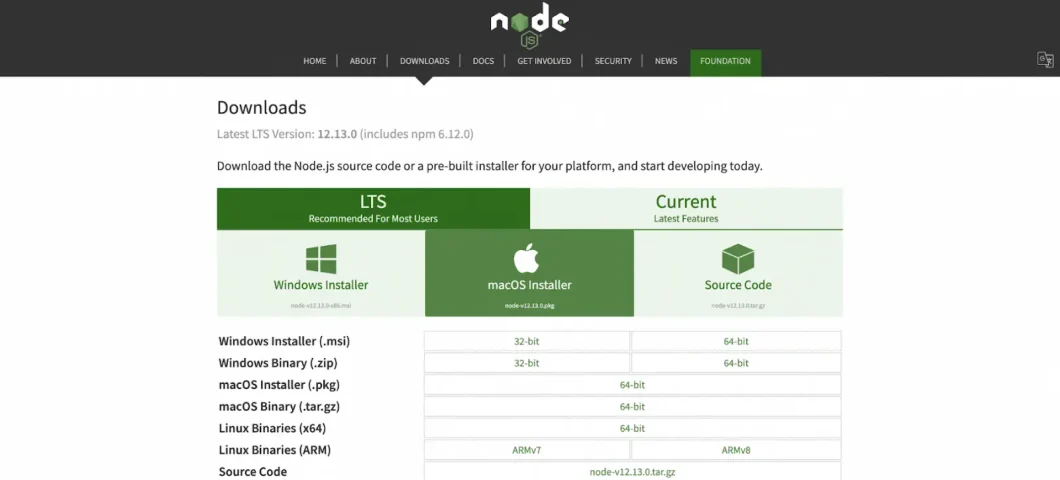
Step 1: Download the Installer
Download the Windows Installer from the Node.js official website. Ensure that you acquire the most up-to-date version of Node.js which comes bundled with the NPM package manager.
In this case, opt for the 64-bit version of the Node.js installer.
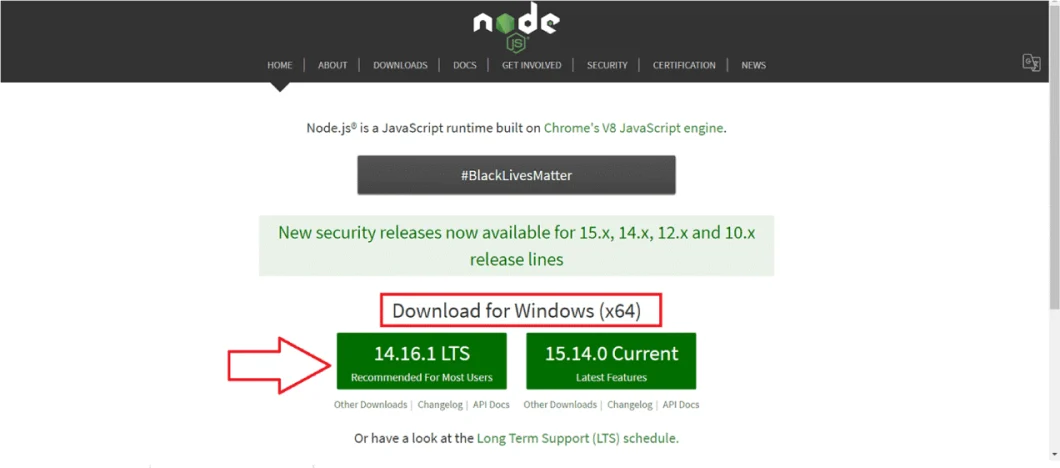
It is advisable to opt for the Long-term Support (LTS) version. Once you’ve downloaded the installer package, simply install it by double-clicking on the file.
Your browser will now download the .msi file. Choose your preferred location for the download.
Step 2: Install Node.js & NPM
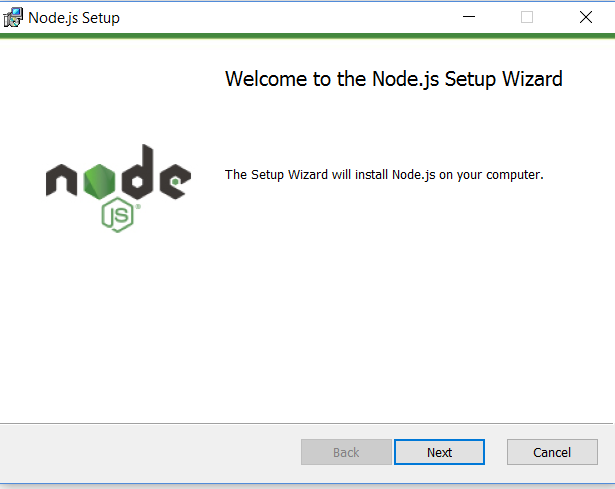
Upon selecting the pathway, double-click to install the .msi binary files and start the installation process. Grant permission to execute the application.
A welcome message will appear on your screen. Proceed by clicking the “Next” button to initiate the installation process.
- Select the preferred directory for installing Node.js.
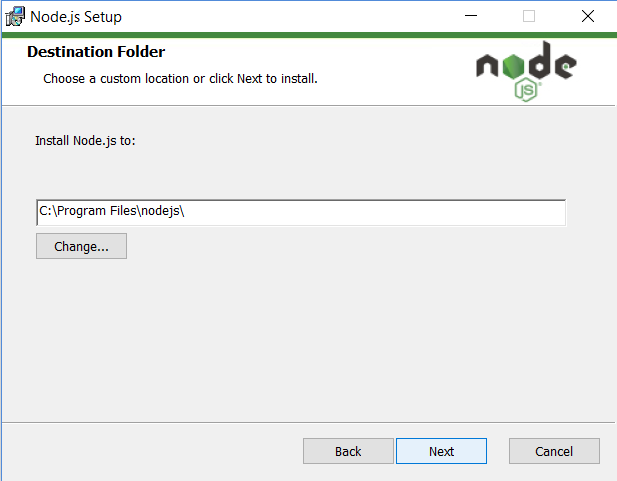
Click the Next button to initiate the setup of a personalized page on your screen. Ensure that you select the npm package manager instead of the default Node.js runtime. This selection will allow for the simultaneous installation of both Node.js & NPM.
Ensure you have a minimum of 143MB of available space for the installation of Node.js and npm features. The default installation will include the following features:
- Node.js runtime
- Npm package manager
- Online documentation shortcuts
- Add to Path
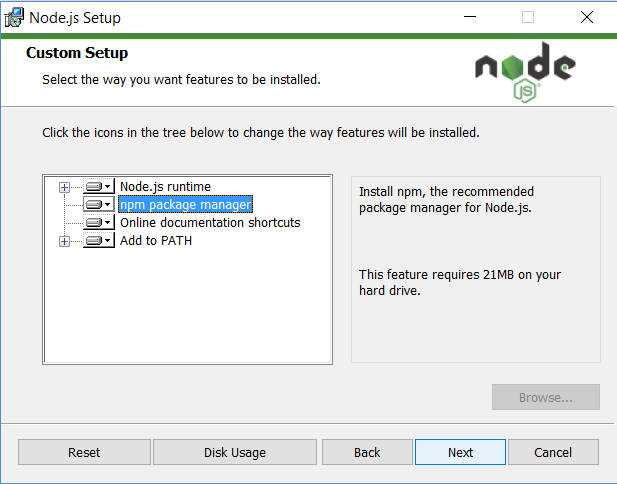
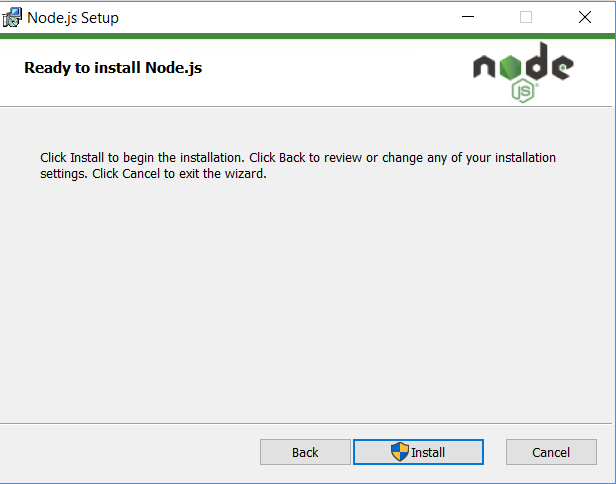
- Boom! The configuration is prepared for Node and NPM installation. Let’s hit the Install button with enthusiasm!
Step 3: Verify Node.js & NPM Versions
- If you’re uncertain about whether you’ve installed everything correctly confirm it using the “Command Prompt.”
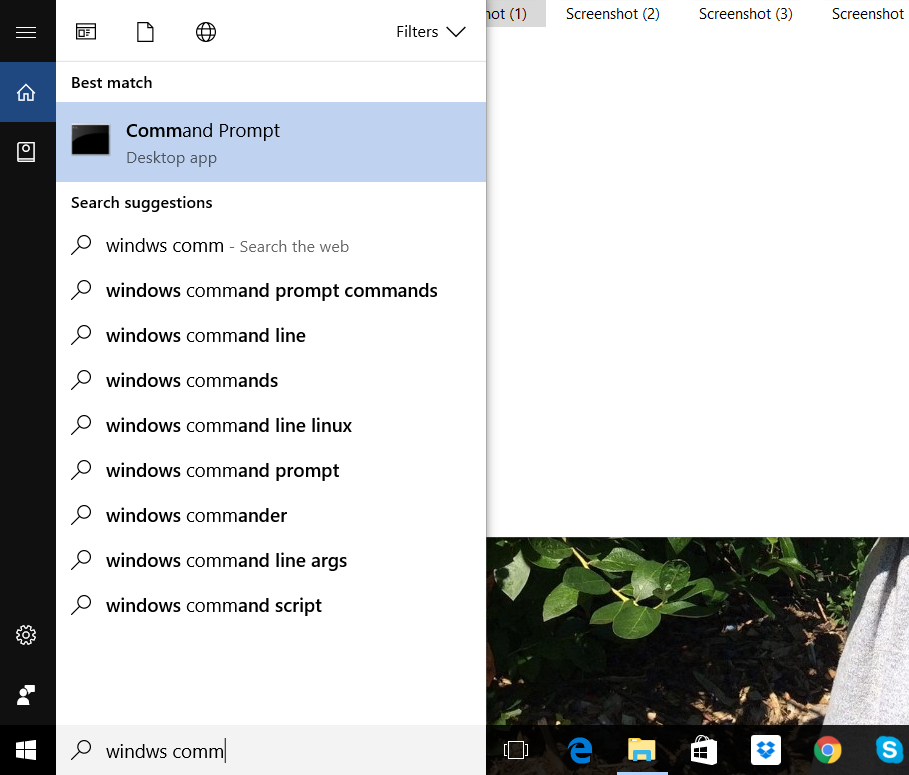
A Command Prompt window will display on the screen.
To verify the installation of Node, enter the command node -v.
To confirm the installation of NPM, enter the command npm -v.
If you see numbers that are not the same as mine, don’t worry. Node and NPM get updated regularly.
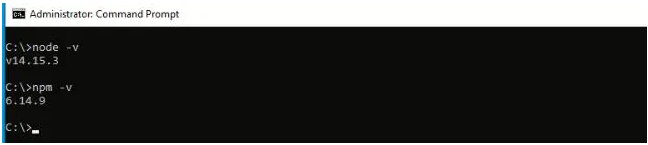
In this case, the version of node.js is v14.15.3 and npm is 6.14.9.
How to Set Up Node.js & NPM on Mac?
If you’re using macOS, let’s walk through the steps for installing Node.js & NPM.
Install Node Using the .pkg Installer
The process is similar to Windows. Node offers a .pkg installer specifically designed for Mac. Additionally, you can download it from the official website.
Step 1: Download the .pkg Installer
To download the .pkg installer, select the “macOS Installer” option. Make sure the download ends up where you want it to.
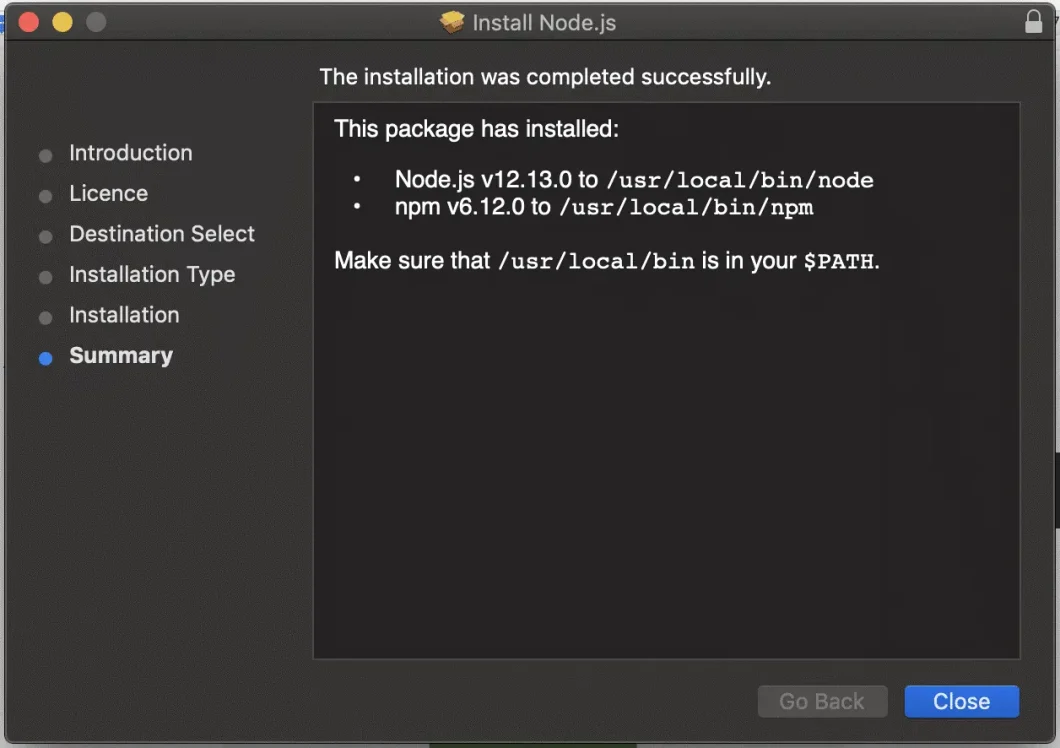
Step 2: Run Node.js Installer
Your setup is ready to run & the installation will be quick. Here’s a detailed explanation:
Introduction > Continue License > Select Continue > Agree Installation Type > Install > Authenticate with your Mac to allow the Installation > Install Software Summary > Close
Step 3: Confirming Node.js Installation
To ensure that Node.js is correctly installed on your macOS execute the following command in your terminal:
node -v
This command checks the version of the currently installed Node.js.
Example output:
v12.13.0
Note: The displayed version might differ and be any other valid Node.js version.
Step 4: Updating Your NPM Version
Node.js does not automatically update the npm version.
Execute the following command and your npm version will be updated:
$ sudo npm install npm –global // Update the npm CLI client
Node.js is now installed on your Mac system. Exciting, isn’t it? Let’s delve deeper into it.
Set NODE HOME in the Environment Variable
Run the given command in your terminal for Mac or Linux systems to set the NODE path in the PATH variable.
export PATH=/usr/local/git/bin:/usr/local/bin:$PATH
In this case, /usr/local/bin is the default installation path for Node.
Including this command in either .bash_profile or .zshrc, depending on your shell is recommended to ensure that these path exports persist across all terminal instances.
To permanently add this command to the .bash_profile file, run:
echo ‘export PATH=/usr/local/bin:$PATH’ >> ~/.bash_profile
Activate the changes for all users on the system by running:
source ~/.bashrc
How to Install Node Using “Homebrew”?
Homebrew, an open-source and free software package management system streamlines the installation process on macOS and Linux by placing packages in their designated directory and their files into /usr/local.
Utilizing Homebrew, we can easily install Node.js. Once this installation is complete, let’s proceed to the next step.
Step 1: Node.js & NPM Installation
Installing Node.js and NPM is a simple process with Homebrew. Homebrew enables you to effortlessly download, unpack and install Node.js and NPM on your device.
Execute the following command in your terminal:
brew install node
This command will initiate the download & installation of the necessary files. Proceed with the installation once the files are downloaded.
Step 2: Verifying Node.js & NPM Installation
Similar to the Windows system, you simply need to enter the commands provided below and execute them in your terminal.
To check the Node version:
node -v
To check the NPM version:
npm -v
Homebrew will ensure that you have the latest versions of Node & NPM installed. Ensure that your Homebrew is up to date with the latest Node package.
If not, run the following command to update Homebrew:
brew update
Then, execute the command below to update the Node version:
brew upgrade node
This will bring Node & NPM to their most recent versions.
Installing Node Using NVM – Node Version Manager
As a Node.js developer, I often receive requests from fellow professionals to install multiple Node.js versions on their devices. Fortunately, this can be easily accomplished with the help of NVM – Node Version Manager.
Follow the provided steps below to successfully install Node.js.
Step 1: Download NVM Using the Installation Script
There are two methods available for installing NVM.
Using cURL:
curl -o- https://raw.githubusercontent.com/creationix/nvm/v0.33.0/install.sh | bash
Using wget:
wget -qO- https://raw.githubusercontent.com/creationix/nvm/v0.33.0/install.sh | bash
NVM will be downloaded & installed using the chosen method.
Step 2: Verify NVM Installation
To verify the installation of NVM, execute the following command:
nvm –version
The output should resemble something similar to the following (though the version number may vary):
0.33.0 # The current version of nvm – yours may differ!
It is recommended to include this command in either the .bash_profile or .zshrc file, depending on your shell. This ensures that the path exports persist on your system & remain accessible across all terminal instances.
To add the necessary details to the .bash_profile file permanently, run the following command:
echo ‘export PATH=/usr/local/bin:$PATH’ >> ~/.bash_profile
Make this change available to all users on the system by executing the following command:
source ~/.bashrc
Step 3: Installing the Latest Node Version Using NVM
Execute the following command to install the most recent version of Node.js:
nvm install node
Additionally, if you wish to install a specific version, you can choose from the available Node versions. Use the following commands:
nvm ls-remote # Lists all available Node versions
nvm install v12.15.0 # Installs Node version 12.15.0
Next, confirm the installation and manage Node framework versions with the following commands:
nvm ls # Lists all installed Node versions
nvm use v12.15.0 # Sets the Node version to 12.15.0
Verify the currently active Node version by running:
node –version
It should display “12.15.0,” corresponding to the version specified in the previous commands. Your Node installation is now complete and you can proceed with developing your Node application.
Important Considerations
If you are using either Windows or OS X, you have the option to utilize one of the installers available on the official Node.js website. Ensure that you install the version labeled LTS (Long-Term Support). Other versions are available, but they may not have been tested with npm.
For Windows systems, you can install Node.js by using the .msi installer provided on the official Node website.
For macOS, Node.js installation can be done using the .pkg installer found on the official Node website.
Alternatively, on macOS, Node.js can also be installed using the Homebrew package manager.
NVM (Node Version Manager) provides a convenient method to install and manage different Node.js versions on the same device.
Conclusion
There are multiple methods for installing Node.js frameworks and NPM on your system. In this guide, we’ve provided the simplest approach for installation on both Windows & macOS. This should be sufficient to begin with your Node.js journey. However, feel free to opt for the system that suits your preferences.
If you have any questions or need assistance in developing a Node.js application tailored to your specific operating system, reach out to HashStudioz Technologies, a leading Node.js development company. Hire Node.js experts to help and guide you.

Frequently Asked Questions
1. How to set up npm in Visual Studio Code?
To configure npm in Visual Studio Code:
- Press Ctrl+P and type ext install npm script runner.
- Restart Visual Studio Code.
Run npm commands directly in the terminal (Ctrl + `) ensuring that cmd.exe is selected as the shell. To set cmd.exe as the default shell, follow these steps:
- Press Ctrl+Shift+P.
- Type > Select Default Shell + Enter.
- Choose > Command Prompt …cmd.exe.
- Restart Visual Studio Code.
2. Can I use npm on Mac?
Certainly, npm can be used on MacOS. Visit the official Node.js website and obtain the NPM package designed for macOS. Upon reaching the official website, choose the suitable file for your system.
3. How to install npm in the Terminal
To install npm, follow these steps in the terminal:
- Open the terminal.
- Install Node.js by running the command:
sudo apt install nodejs
Verify the installation of Node.js with either of the following commands:
node -v
or
node –version
Install npm using the command:
sudo apt install npm
Confirm the npm installation by running either of the following commands:
npm -v
or
npm –version
4. How to install npm using the command prompt?
To install the latest npm version, enter the following command in the command prompt:
npm install -g npm
To verify whether Node.js & npm are already installed and to check their versions, use the following commands:
node -v
npm -v